

My first blog post of 2022! I hope you’ve been keeping well. I have so many things I want to share with you this year on all sorts of topics, but this one is really something I’ve wanted to write about for a long time. With the rise of social media I’ve found that it’s really easy to get sucked into the comparison game and I will be the first to put my hand up and say I’ve lusted after many a craft room. Doesn’t every crafter dream of a craft room of their own? Whether it’s a space to fill with yarn or cardstock, or somewhere to get your sew-on? Having that dedicated space to craft? What a dream! But we don’t always have that space to spare or, may not even want to have a separate room. Personally, I love my sewing corner in the living room and the dining table is still my main space for cutting etc. Recently when I shared this on Instagram I was overwhelmed by messages from others saying how refreshing it was to see other people’s crafting set up- from desks, floors to dining tables. As I always get questions about my set up (which sits in the corner of our living/dining room), I thought I’d share a bit on how I created my nook and hopefully inspire you with craft ‘room’ ideas for smaller spaces.
I’ve split the blog post into two parts because it was getting a bit hefty with all the info and links. This first one focuses on the bigger bits of furniture I use, with ideas and hopefully some tips to help you curate your space and the second focusses more on maximising storage/DIY hacks and my sewing set up.

Find a space
Finding a space is probably the hardest bit. Over the years my crafting has mainly happened from the dining table. It was only when we moved to our house 4 years ago that I was able to make a dedicated space for myself. I didn’t want to set up in the box room upstairs as it felt so far away from everyone else (mainly just me and Taufiq at the time!) so instead I took up the space in the far corner of the through living/dining room. It’s actually the corner behind the door so you can’t really see it from the sofa and one of those dead spaces around the dining table. I love that its a bit hidden but still very much in the heart of the home with the rest of the family.
Perhaps you’ve got a similarly unloved corner of the room or maybe even a nook under the staircase? Medina @Grillodesigns created a fab desk space under hers (if you don’t follow her, you must! An empowering voice and inspiration to seize the space you have, rented or not, and create a home which nurtures your soul.)
I think the trick with a small space is being realistic about what you’re going to be able to do with it. You’re not going to be able to store all of your materials etc like you would with a dedicated room. But you can try and prioritise the most important bits and pieces. For me, having my sewing machine plugged in and ready to go has made a huge difference to my crafting. Not having to lug it out and on top of the dining table means I’m more likely to just have a quick sit down and sew a little. I’ve even been known to repair some loose stitching on a dress before heading out (although, I was also super lucky it was already threaded with matching thread!)
And depending on how you furnish it, your space doesn’t even have to be very big. When tidied away, my space is the width of the bureau, so 90cm with a depth of 47cm (when the table is closed). I used to have a dedicated desk chair which tucked in but thats been moved to my work desk upstairs so now I just swing around a dining chair instead. So try and think outside the box when thinking of where you could set one up.
Furniture
I love multifunctional furniture- and by that I mean furniture that are multipurpose in design, like my bureau which folds out to be a desk and has a shelf/storage on top, or my dressing table seat which is actually a stepping stool and super handy as I can use it to reach the top of the cupboards (short people problems).
And I also mean furniture that can be used for different things e.g. live one life as a craft shelving unit or another in a kid’s room. When you’ve got limited space I find it’s best to try and get the most out of each item you have. And if we’re thinking environmentally, you’re going to want your furniture to last as long as it can and have as many lives as possible as your home grows/moves with you.
My sewing corner is made up of a no-longer-sold (sorry!) bureau from IKEA. The reasons I love it are: it fits my sewing machine inside. That means it is set up, plugged in and ready to go at the switch of a button, ideal when I’m short on time to sew. And then there’s my favourite feature: that the table folds up and hides away any mess making it a super quick to ‘tidy’ my sewing corner. This particular one also has storage on the top which is an extra win.

As it’s no longer in stock here is what I would look out for if you want to get a similar set up:
- The set up of the inside space. Some bureaus have shelves lining the inside which means you won’t be able to get a sewing machine in there. But you could organise cardstock/get a Cricut Joy in there! So it depends on your craft!
- The other thing is the table strength. The downside for my set up is that it isn’t ideal. The floating table means theres no support underneath and weight/pressure goes on the hinges. To counter that, I don’t pull my machine out completely to sit on the free floating table. My Pfaff Performance Icon is far too heavy, instead it sits half in/half out. It works for me but I would move to the dining table if I was sewing something large/needed it to be more stable, especially at faster sewing speeds. I imagine it’s not for everyone but if you’re short on space it might be a worthwhile compromise. Check to see what weight it can take and check this against your machine. And definitely secure the bureau to the wall!

Here are some options I found on a quick Google search that might fit the brief (but please do your own research as I have not tested these out personally):


Oak & black from Made.com, Blue bureau from Made.com, White Hemnes bureau from IKEA, Habitat Nomad from Argos (desk can hold 15kg)
Other options might be a drop leaf table with storage. These would be great for creating extra space for cutting/sitting at. Depending on the storage bit you might even be able to store your machine in it too! IKEA have a few which are firm favourites with crafters (NORDEN table pictured below).

Wall mounted tables are also a nice touch as they can provide extra surface space but also be a cute shelf when not in use. I’m *not sure* these can take the weight/motion of a machine, but perfect if your craft is something that doesn’t use heavy machinery! (Check the details as they sometimes put max weight in the description)

You’ve probably also heard of Create Room aka “Dreambox” with their distinctive cupboard/magical storage/craft stations. How could I not give them a mention if we’re talking innovative craft spaces? Of course there’s the hit DreamBox but that requires a depth of 86cm and then the space to open out into. But aside from that they’ve got some highly functional furniture too e.g. the Sew Station or Dreamcart which might work in a smaller space, but the price tag would definitely make it more of an investment.

The other large furniture items I have are in the spare bedroom upstairs, which had its bed downsized to fit a work-from-home desk after the pandemic. Like most people I quickly needed a space to work from home so decided to make the spare room less of a laundry dumping ground and more functional. One of the best items in here is the ol’ faithful Billy shelving unit from IKEA.

I got this in the narrow depth to fit the wall recess and with the ceiling extension to maximise height. I love how the Cricut machines look on display here and my storage hack (in part 2) means that even though its only 28cm I can fit my Cricut materials and mats in easily. As much as I love open storage with neatly labelled boxes, I also know I would never be able to keep it tidy. Having doors at the bottom makes the perfect balance and lets me hide the more messy bits and pieces!
Alongside my desk I also have a IKEA Micke drawer unit on casters. This was mainly so we had a drawer for admin filing but it also extends the work space of my desk (I have a second monitor for work). Its got the perfect sized drawers to store paper/cardstock (as demonstrated by this IKEA photo!)

But it also makes a really great surface (albeit narrow) for small flat lays/photography, especially as I can move it around the room chasing the natural light (some blogger-y tips for you!) I’m also going to be adding some Command hooks to the side of this to hang the larger Cricut cutting mats. Just need to go buy some!
Have fun with it
I’ve just highlighted what I have, what works for me and some potential alternative ideas. But I think it’s important to reflect on what you want from your unique space. For me, the things I need from my crafting space are:
- Practicality- to have the things I need to hand so I can be time efficient and get the most out of my precious craft time
- Easy to tidy or…at the very least- easy to ‘tidy’ aka shut the door and hide the mess!
- Be inspiring
That last one is so important. Of course the idea of having a dedicated space so you don’t have to keep lugging your craft materials around is amazing (and time saving… can you tell I’m short of time!?), but it is so special to be able to have a space that inspires you to craft, that makes you want to sit down and do something with your hands. I want a space that gets my creative juices flowing, even if it’s only for 5min. Because I know that just those 5 minutes have such a huge impact on my mental well-being, from my roles at home to my work. So have fun with it and create a space that calls you and draws you in! There are so many inspirational craft rooms online- why not bring an element of those into your space? You don’t need a 3m x 3m room, just a little corner with some clever ideas can pack a punch.

I’m going to leave it there for today, but I hope that has been helpful so far! I’ll be back with examples of how I maximise storage around the home (because why pretend my craft supplies aren’t in every room!) and hopefully share some handy tips whether or not you have a dedicated space, room or trusty dining table!
Let me know in the comments if you have any questions or if you have any recommendations too!
Love,

Thanks for the post, really enjoyed it!
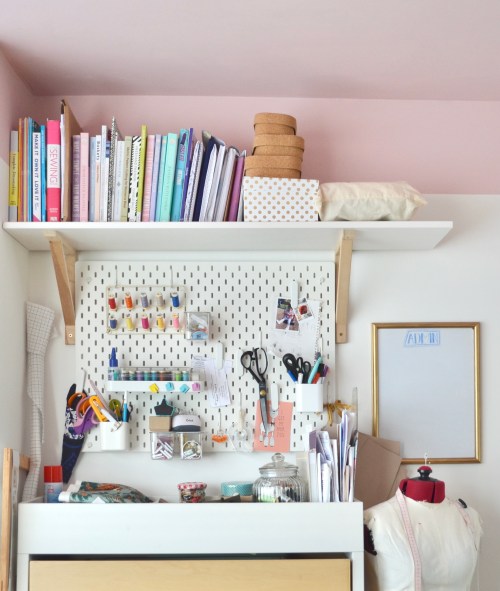
Can you let me know about the peg board type thing behind your desk please? I’m looking for something similar with the thread reels.
Yes! It’s in part 2 🙂 (but its the Skadis pegboard from IKEA with a spool holder