

Last year I embarked on a sewing saga making my namesake coat, the Rumana coat. This pattern was actually released years ago by By Hand London but for lots of reasons I only had the time (and confidence) to dive into making it last year. It was one of those slow and steady projects, with toiles and tribulations- but the end product was something I was really really proud of. Apart from the actual pattern itself, there’s a few things that I learnt along the way which stepped my sewing up a notch, giving it a really clean and crisp finish.

So, I thought I’d share the top 5 tips and tricks I learned to get a great finish. I should add though- these are speed tailoring techniques I picked up from my research, combining a bit of traditional tailoring with some short cuts. I’m not pretending these will give you the same finish as a properly tailored coat- but I’d say it’s not too shabby for someone short on time (and also lacking in skillset because let’s be honest- my tailoring experience is zero!) But I’ll be sharing some of the resources I used, as well as techniques so keep reading if you’re new to coat sewing. Hopefully you’ll find it a helpful read! (Also apologies for the poor quality photos- I’ve taken them from the Instagram stories I shared whilst making it).
Coat Sewing for Beginners: Tips and tricks to get a great finish
Jump to:
- My coat making experience
- Interfacing
- Clapper and pressing tools
- Twill tape
- Sleeve heads
- Hand-stitching
- Resources
My coat making experience

Before we get into the nitty gritty I should probably tell you my coat making experience/background. It’s pretty limited! The first ever coat I made was actually on TV, as a contestant on The Great British Sewing Bee. I didn’t have much time to spare going into the series and so only practice the pockets. This meant the first coat I made was on the show, in 5-6 hours with cameras following my every move. Let’s be honest, in hindsight I was a deer in headlights and had no idea what I was doing. I bagged out the coat (again, never done that before!) while the time was counting down and was horrified to find the hem was completely wonky. I had no idea why it was wonky but I was completely traumatised and put off coat sewing.
Until, for some reason I decided to make Taufiq a coat (I’m still not sure how/why I agree to this). But this one went pretty well- there were a few disasters but overall I finished a coat, learnt something new and didn’t get a wonky hem. He was so happy with it and to this day still gets asked where his coat is from (and he gets a real thrill telling them his wife made it!)

But with each sewing project I like to push myself a little further and try something new, which is where the Rumana coat came in. I honestly love the finish of this coat- a year on the stitching and finishing still holds up. It’s definitely not perfect (please don’t walk away thinking I’m some sewing maestro!) but I’m really proud of how far I’ve come with my coat sewing. So, what I’m trying to say is: getting a nice finish to your coat doesn’t have to be hard or require lots and lots of experience. There’s a few simple things that can make a huge difference, from tools to techniques. It might take a bit longer (and a bit of patience) but the payoff is well worth it. So enough waffle- Tip no.1…
Interfacing

Pick the right type
You might have heard before about interfacing being the thing that makes or breaks a coat? You know what, I don’t think they were lying! When I made Taufiq’s coat I didn’t really know what I was looking for and used some standard interfacing, in hindsight- you can really notice it. Using the right interfacing helps to create that structure and smooth finish we’re used to seeing in RTW coats and professional finishes.
What you really want is tailoring canvas. There are different types, weights and compositions of this. The one I went for was a fusible canvas (you might have heard of the term ‘horse hair canvas’?) Traditionally you’d want to use the sew in version- which needs to be tacked in place with teeny tiny stitches (pad stitching). I used the modern fusible sort, and to be honest will probably use that next time too! It combines some of the ease of newer techniques with the benefits of the traditional material. Use this to interface the pattern pieces as required with some adjustments.
What do you to interface?
So this is the second part of this tip- most patterns will tell you which bits to interface. On the whole this will be the collar and maybe the front? But actually you want to be doing a lot more.
For my Rumana Coat I added interfacing to the: front body, upper back, sleeve hem and main hem.
Depending on the coat style and the fabric you’re using, you may actually want to interface more of the main body. As a minimum you want to be interfacing the front and then some of the side of the body too (I only did the centre front pieces in my Rumana coat but next time will interface the front side panels too- up to the pockets).
A little aside, and resource no.1: I found this absolute gem of a PDF online from the North Carolina State University Archive, Techniques for Tailoring. This outlines…basically everything! But specifically here, it shows you how to draft your new interfacing pieces from your existing pattern.
Then you want to be interfacing the back, a ‘back stay’. This will give you a lovely smooth back and prevents it stretching out. An absolute must! (see the PDF for pattern drafting instructions for a backstay.)

You will also want to create an interfacing band for the sleeve hem (this was included in my pattern), along the vent (also included in the pattern) and the rest of the hem- this was quite deep on mine- approximately twice the depth of the outer shell hem.
Things to note when using interfacing like this- it’s heavier weight and needs to be cut away from seams to prevent it getting too bulky. You’ll need to trim away the seam allowance (if it hasn’t been already done in your pattern) and trim away the darts. The PDF above also shows you how to treat the darts and reinforce them if needed.

Clapper and pressing tools
They aren’t joking when they say at least half of sewing is pressing with the iron. Pressing often and correctly will give you the nicest of finishes. Plus there are a few tools that are absolutely worth the investment in if you’re making a coat: a clapper, a tailors ham and a sleeve roll.
These work really well certain fibres of fabric e.g. wool, but as ever you’re going to want to test your iron/steam/heat and techniques on a scrap piece of your fabric before diving in. Using a pressing cloth is also important and will protect the surface of your fabric from becoming shiny or damaged (and your iron from gunk!)
Clapper
Can we please have a round of clapping for the humble clapper? This, this right here is an amazing tool. There are different types and prices range a lot. Personally, I bought the Premium Tailor’s Pressing Clapper from William Gee. It was around £28 and didn’t include the point presser other styles of clappers do (used to help create pointed tips e.g. collars).
The clapper is key to getting those seams and hems super flat. This is essential in coat making, especially when using bulky materials like wool, even if you’re top stitching the seam you still won’t get it quite as flat without a clapper.
You use it by applying steam and heat to the seam and then quickly trapping it into the seam by placing the clapper on top, holding it down with a little pressure. The clapper absorbs the steam and keeps the heat in place. As the fabric cools the seam ‘sets’ in place. You’ll want to do this with every seam, taking care to follow the pattern instructions and pressing the seams open/to the sides. It’s time consuming but don’t skip this step. Consider it a relaxing break from the sewing machine! I can honestly tell when a hem/seam hasn’t had a clapper applied to it- it has a bouncy look which just won’t go with a normal iron press.


Tailors hams and sleeve rolls
These are helpful for any garment sewing but you can probably get by without for standard dress sewing. When it comes to coat sewing, it makes the world of difference. You can buy tailors hams (£12-15) and sleeve rolls (similar price), ready made. Or you can use free templates to create your own. There’s one side which is woollen and one which is cotton/canvas.
The key, if you DIY it, is to stuff it FULL so it is super tight and doesn’t get softer/lose its shape with pressing. People use different things to fill them but I think saw dust is the favourite. I actually cut up my scraps of wool (from cutting my pattern pieces) into small wadding style filling. This did the trick for me and I like that it reduced the waste from my coat.
Use the tailors ham and sleeve roll to press and shape your coat as you go along. From pressing seam lines (e.g. the princess seams on the Rumana coat) to shaping the sleeve head*- these will help give you that structure. *This bit really is magic, see the sleeve head shrink into a beautiful shape. Steam, steam, steam it!
Pressing will help you shape parts of the coat; you’ll want to leave the coat to ‘cool down’ in place on the tailors ham etc. Don’t move it away while it’s still warm/hot as it will lose its shape. Letting it cool in place will let the shape set.
Twill tape
Ahh twill tape, you magical thing. I used cotton twill tape (which is the recommended sort) in my shoulder seams and break-line (or roll-line). But there are other places you might want to use it. Its used to stiffen and strengthen spots which might otherwise get stretched out (e.g. shoulder seams).

The break-line (or roll line) is where the lapel and collars fold back. This is sometimes marked out on the pattern itself but if it isn’t (like mine) you can try it on (or put it on a mannequin) and mark it out with pins. Using the twill tape along the break-line will help the collar and lapel keep its shape. Having not done this in Taufiq’s coat the difference between our coats are huge. It really does at a lot of structure to such an important part of the coat. There’s just something to luxurious about putting on a coat with a good stiff collar against you neck.

You do need to hand stitch it in place but the effort is so worth it. I followed the instructions in resource no. 2 to create my collar and shape it.
Resource 2: “Tape and pad stitching” from the archives of University of Nebraska – Lincoln is another little bit of archive gold: this little PDF shares how/where to apply twill tape and also more on pad stitching.

Sleeve heads
We all know about shoulder pads (actually something I didn’t add to this iteration of the Rumana Coat but I probably will next time. But sleeve heads? I had never heard of them, but what a difference they make! These are so simple but help to stop the sleeve cap from collapsing inwards. This is actually quite subtle in the photos but definitely visible in person. It’s so simple you might as well add them in!

There are different instructions on how to make them but I kinda winged it. The key is to cut them on the bias and stitch them as close to the stitch line as possible- you could hand stitch them in.

And here’s resource 3 for you! From The Texas A&M University System Archive, “Tailoring for Today” by Barbara Field. This goes through so much (basically everything already covered by the others and more- but has a more detailed section on sleeve heads.
So, aside from shoulder pads- consider adding these in too!

Hand stitching
We all know that hand stitching is the real MVP here (most valuable player)- theres a reason why high level tailoring and couture costs so much. The level of hand stitching that goes into these garments is mind blowing. But our hands are magical things and there are just some things you can’t replicate with the machine.
Pad stitching
Pad stitching is the technique that you’ll see mentioned the most when it comes to tailoring. Its a special stitch which creates very small pin prick stitches which shouldn’t be visible from the right side of the fabric. This is what you would use to secure your non-fusible/sew-in canvas to the outer fabric. It also helps to shape collars and lapels (with the direction of stitching) and provides extra reinforcement and structure on top of the canvas. All of these things will give you a longer lasting clean look to your coat.
But I’m going to be honest with you- I didn’t pad stitch my coat. Like I said, I’m short on time and it felt like that one step too far for me, but I might try it next time. But I couldn’t not mention it!
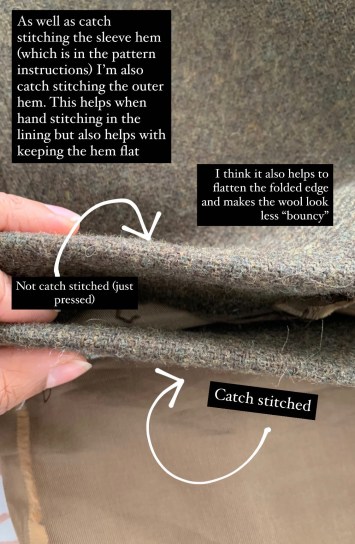
Herringbone stitch (Catch stitch)
But this is a stitch I did use. Again this method is mentioned in a lot of the resources and tailoring books/blog posts. It seems to be called ‘catch stitch’ in American texts?

I used it for the sleeve hems and the main coat hem (from the vent down). Its a method of hand stitching a zig zag stitch where you barely see if from the outside but it allows movement on the inside. Here’s a tutorial for the actual stitch. I used it to attach the folded hem to the outer fabric, creating a sort of hem facing? Using it this way meant I was able to secure the hem more- which made it less ‘soft’, and kept it in the right place. And it also made the whole hem much less bouncy- again all steps to give a very clean finish.
Hand-stitching the lining and hem
As I’ve already mentioned, I’m slightly traumatised by the whole bagging out method for coats- don’t get me wrong, I’m sure it works fabulously for lots of people. But it’s just not for me. I prefer the control I get with sewing my hem and lining by hand. You can let it hang and make sure you’re not getting any pulling with the lining (the issue I had with the bagging out method). But it is easier to do with a mannequin as I was able to hang it on and pin the lining in place. Again, there are lots of methods out there for how you can hand stitch a lining (also mentioned in the resources)- but in my opinion it’s worth the effort. And is a surprisingly relaxing and satisfying final step of making a coat! So, if you’ve had a bad experience with the bagging out method then maybe give hand stitching a go!

Also a note: before sewing up the hem I did anchor the lining to the coat at the armpits with thread chains. This helps to keep the lining in place in the upper body.
Inspired to give it a go?
So that’s it! Those are some of the things I did with my coat which made it (in my opinion) just that little bit better than the last one I made. I actually can’t wait to apply the same things-and probably more (pad stitching is calling my name) to my next coat!

Are there any tips that you’ll definitely be taking forward? Or is there something that I absolutely should try/missed out? Let me know in the comments!
I hope you’ve found this helpful-I promise to take better photos next time!
Love,

Resources
Summary of resources:
Thanks for this post! I’m not quite ready to make myself a coat yet (I’ve got a couple of perfectly good ones) but I will definitely use this post when I finally do.
I always find that the projects that I take my time with, that I research and put a lot of care into, come out better than one’s that I rush through. Part of that is definitely the work that goes into it, but I also think that part of that is that I’m more willing to forgive any mistakes I made because I know that I worked hard on it and didn’t rush through.
Thanks for sharing your resources with us! I can’t wait to dive deep into them.
Ahh thank you for the lovely message- I do hope you come back to this when the time comes 😉 You’re absolutely right- and there’s definitely joy to be taken in that deep dive/slow paced project. I’m sure it adds to the sense of achievement at the end!
Great Post and tailoring tips, I’ve made a couple of coats and love them but want to make more so I’ll definitely try to remember to refer back to this
Thank you Rachel! 🙂
Thankyou! I have a coat ready to make, so your blog just filled me in on what I’m going to need. I love your resources also! Laura
thanks Laura! Glad you liked it 🙂
Hi, thanks! I’m reading coat tips since I’m getting ready to make one. Thanks for the resource links too. Your coat is lovely!
Thank you! Hope it helps with your coat making journey!!