What an exciting week! I don’t know about you guys, but I religiously look at my stats…possibly on the obsessive side. But each view brings me sheer delight. Each ‘like’ and new follow is announced to the family at dinner. And this week I had the pleasure of explaining what ‘Pinterest’ is to everyone because I logged on to find my little blanket buddy had been pinterested! Yay! Thanks for coming to my blog, I love writing it and love hearing from you guys even more. I hope I’m making things look achievable and convincing you to give it a go!
Anyway, I can’t expect you guys to come back to my blog if I don’t give you something to read right? So today I’m sharing how to make ribbon embroidery leaves. The first is just a ribbon stitch and the second, what I think is called a lazy daisy stitch. Both can be used for leaves and petals. Lazy daisy leaves are larger, whereas the ribbon stitch ones more dainty.
Materials
- 6mm ribbon
- Chenille needle
Ribbon stitch
- Decide where you want your leaf and bring your needle up through the material.
- Keeping the ribbon flat, bring you needle back through the centre of the ribbon about 1-1.5cm along (this length tends to make a nice leaf shape).

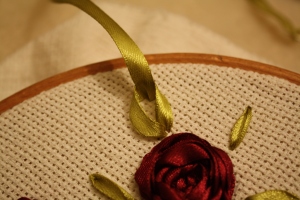
- As you pull the ribbon through you’ll notice the end starts to curl in on itself (shown in the photo). At this point be gentle and watch as you pull the ribbon- pull too much and you end up with a non-leafy shape, pull just right and you’ve got your perfect leaf! (shown in the next photo). All done!


Lazy daisy
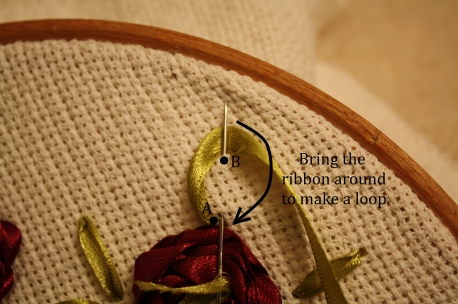
- Decide where you want your leaf and bring your needle up through the material (point A in the photo).
- With your needle only, go back in next to point A, bringing the needle out approx 2cm along (point B).
- Bring the ribbon around to form a loop. Use your thumb to keep the ribbon flat (stop it from twisting around).

- Pull your needle through. The ribbon will make a loop.

- As you keep pulling it will come together to make a leaf shape. You can leave the loop as closed or as loose as you like.

- Stitch back down just above the ribbon loop to fasten the leaf in place (see the top most photo for how they look at the end.)

I hope I don’t make things more confusing! I try to keep it simple but end up typing an essay anyway! Whoops. Anyways, next time I’ll be doing another type of rose so keep posted.
love,
little pomegranate


Which size chenille needle do u use?
Ooo, I’m not sure! I’ve got a range so I generally grab which ever is nearest! (This set to be exact: http://www.jjneedles.com/products/Assorted-Chenille-Needle-%252d-All-Sizes.html). But I guess I’d go for the largest one, size 22
Thanks sweets. Bought my chenille needles and ribbons today so all set to go as soon as I can find where my hoop is hiding!
Hey! great work there 🙂 i was just planning to try out ribbon embroidery and here in India we do not get silk ribbons 🙁 was wondering if i can take up the work with nylon ribbons and also hey what kind of cloth are you using? The threads seems to be kind of a little widely spaced right?
Hi Angela, thanks for the comment. I actually used nylon/polyester ribbons and it seems to be fine- it may not sit quite as smoothly as silk ribbon, but for me- it does the job.
The fabric I used for these tutorials was just some scrap cotton cross stitch material, I wouldn’t necessarily use it for an actual project though. Normally I use cotton. Hope that answers your questions!